Recently I've started playing around with the GPIO pins on the Raspberry Pi again. It's been quite some time since I have had the opportunity to do so. Most of my projects in the last few years have revolved around running various web interfaces or servers on RPi. Since I prefer to run my Pi's headless and without a desktop I decided to see if there was a decent method to write and execute code remotely on the Pi.
While writing the article Remote Linux Administration Using Visual Studio Code I came across an interesting project on GitHub called code-server. Code-server is one of the backend technologies developed and used by coder.com. According to coder.com, "Coder moves developer workspaces to your cloud and centralizes their creation and management. Keep developers in flow with the power of the cloud and superior developer experience". Basically, coder.com provides tech to enable remote secure cloud-based dev environments for dev teams.
Services such as this are really starting to build momentum within multiple industries and they are something I encourage everyone to keep an eye on and test out. I may request a demo of their full platform and write an article about it in the future.
What you will need
• A Pi with a 64bit processor (Pi 3, Pi 4, Pi 400, or Compute Module 4)
• 64 bit Raspberry Pi OS or alternate 64 bit Distro (32 bit will not work)
• A computer (Windows, Mac, Linux, who really cares)
• code-server (ver. 3.8.0 at the time of writing)
• nGinx (1.14.2 as of this writing)
All of my normal Pi's are busy handling various tasks for me except for my recently acquired Pi 400. Now I know what you are thinking if I want to run this as headless why would I use the Pi 400. Well, I am struggling to find a valid reason for the Pi 400 to exist in its current incarnation anyway so I decided to put it to use as my test/development system.
First I setup the Pi 400 as a headless system. Next, I ran raspi-config and reset the host name to pi400 to be able to differentiate the Pi 400 from other pi's on my network. A quick reboot for the changes to take effect and I'm ready to begin.

(Update 4-10-2022)
I was running through setting this up on an old Pi 3 this morning and ran into some issues.
npm ERR! ERROR: code-server currently requires node v14.I checked the current version of node.js installed and found that somewhere, at some point in the past, I had installed node 16 on this particular pi. To rectify this I ensured that the node 14 repo was available
curl -sL https://deb.nodesource.com/setup_14.x | sudo bash -Removed the current version of node then updated the pi's repo index
sudo apt remove nodejs
sudo apt update
Then re-installed node and double checked to ensure that v14 was indeed installed.
sudo apt install nodejs
node --version
Now we can continue on with the same install instructions as before
(End Update 4-10-2022)
Per the instructions in README.md on GitHub I can download and run the installation shell script using curl
sudo curl -fsSL https://code-server.dev/install.sh | sh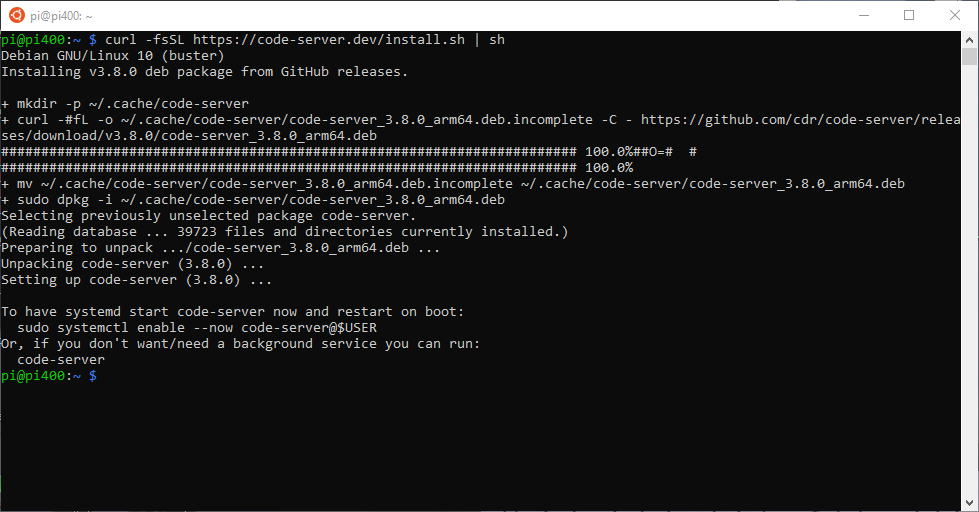
And following the instructions provided at the end of the installation. To set code-server as an auto-start service
sudo systemctl enable --now code-server@$USERcode-server is now running as a system service and available on the local host only. We can verify this with curl which shows us that the website available at http://localhost:8080 redirects us to ./login
curl http://localhost:8080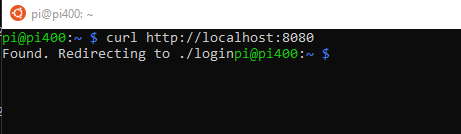
So how does this help us in a headless Pi setup that doesn't have a GUI or browser? It doesn't yet. Now we need to expose this web interface to the rest of the network. To accomplish this we are going to set up NGINX. Per Wikipedia, "is a web server that can also be used as a reverse proxy, load balancer, mail proxy and HTTP cache". We are going to use NGINX as a reverse proxy to redirect localhost port 8080 to 0.0.0.0 port 80, exposing it to the entire network.
First things first, lets make certain apt is aware of all the latest packages
sudo apt updateNow lets use apt to install NGINX
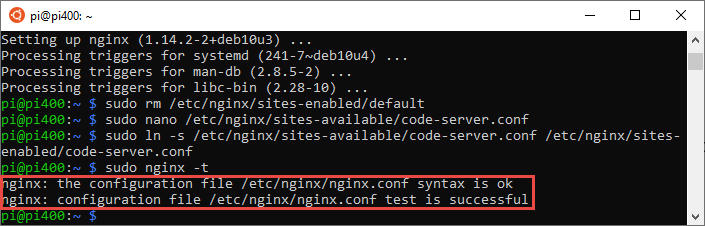
sudo apt install nginxRemove the default NGINX configuration
sudo rm /etc/nginx/sites-enabled/defaultUsing nano, create a new configuration specific to code-server
sudo nano /etc/nginx/sites-available/code-server.confPaste the following snippet into the code-server.conf file.
server {
    listen 80;
    listen [::]:80;

    server_name code-server.your_domain;

    location / {
        proxy_pass http://localhost:8080/;
        proxy_set_header Upgrade $http_upgrade;
        proxy_set_header Connection upgrade;
        proxy_set_header Accept-Encoding gzip;
    }
}
Next we need to enable our proxied web site in NGINX. To do this we create a symbolic link from our custom config file located in /etc/nginx/sites-available to /etc/nginx/sites-enabled
sudo ln -s /etc/nginx/sites-available/code-server.conf /etc/nginx/sites-enabled/code-server.confBefore restarting NGINX to initialize our new settings, we need to test our config file to make sure we did not make any mistakes.
sudo nginx -tYou should receive the result message below.
Either reboot your Pi, or restart NGINX for these new settings to take affect
sudo systemctl restart nginxIf everything went to plan, you should be able to browse to your Pi's hostname or IP address and see the login screen for code-server
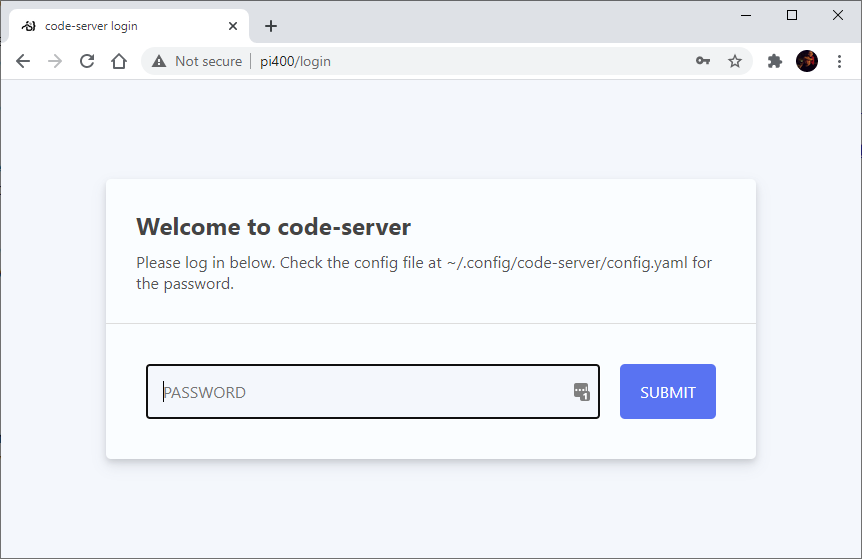
So what is the default password? The password is auto-generated when you first install code-server. Again using the terminal you can retrieve your instance password from ~/.config/code-server/config.yaml as indicated in the abovce screenshot.
sudo nano ~/.config/code-server/config.yamlYou can change this password to one of your choosing in this yaml files or like me, use this password and allow your chosen password manager to save it for you. Lately, I have been testing out LastPass, but your browser's password manager will suffice as well.
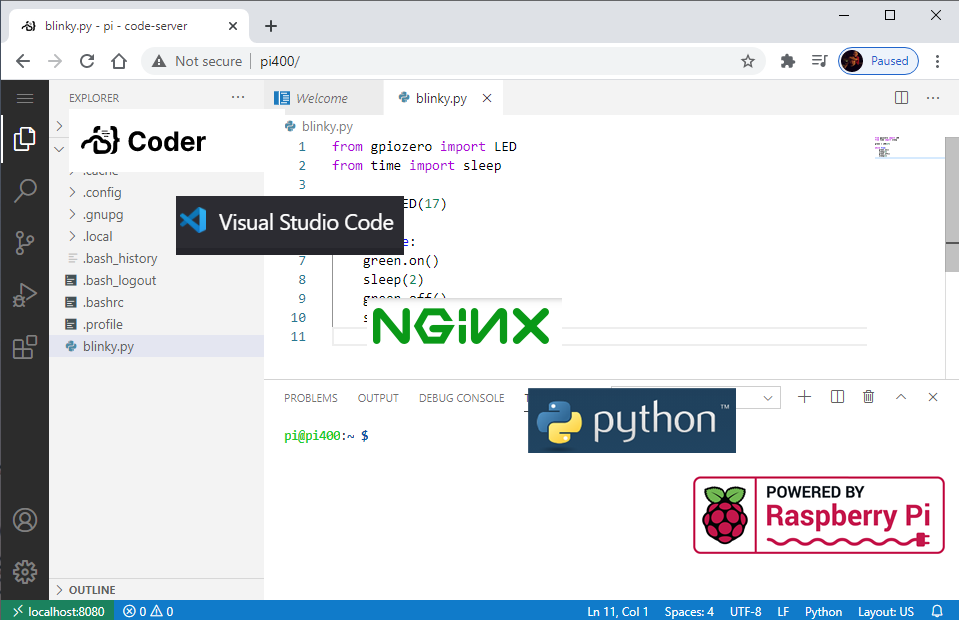
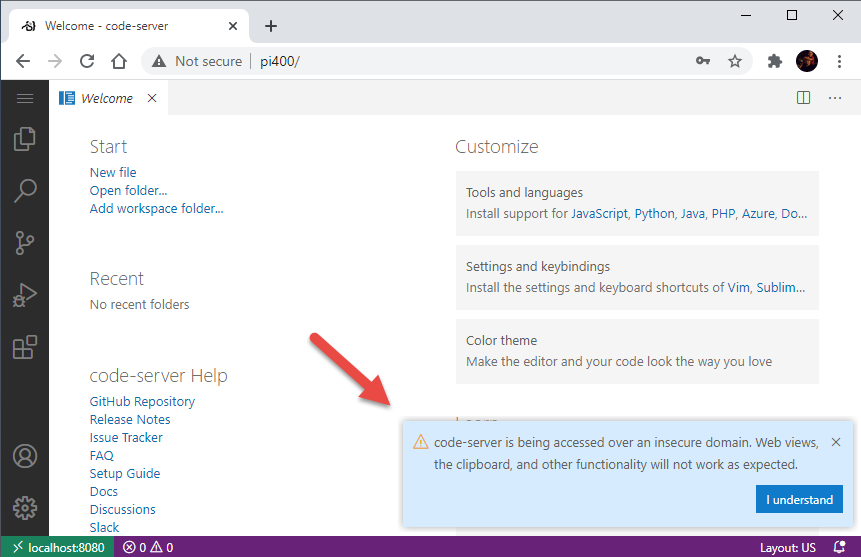
Once we are logged in you will see an interface very reminiscent of but not exactly the same as VSCode. Note the warning message in the bottom right corner.
At this point, you can use the system as is, or use Let's Encrypt to get an SSL certificate. I'll write another article later on how to use Let's Encrypt with NGINX.
To test and ensure that we can remotely execute code and interact with the GPIO pins, we can implement the standard RPi blinky program and run it through code-server.
All of this awesomeness with the added benefit of having terminal access to your pi via the browser as well.